When we bought this house and land...we had no idea about how our life would change. We have been living here now, for almost 4 years and this year I gave up work to be at home full time. It now makes me wonder how I ever managed to fit a job into this life or this life into a job!
We start our Sunday at 8am...the alarm goes off and it always feels like we have just got into bed, not been there for 8 hours!
We get up, the kettle goes on and our day starts with sorting out the food for all the animals. We feed them a mash at the moment and so the food sits for half an hour to absorb the water it is mixed with. This is our time to have coffee and get ready for the day ahead.
At 8.30am we brave the cold (as the sun is still behind the mountains) and go to feed. It now takes both of us for this job as the turkeys are so big. Kev feeds them, while I feed the chickens and the ducks.
After this chore is complete and while the animals are still busy eating, we set about cleaning them all out. I do the rabbits and the palettes where the turkeys roost. Kev cleans out the chickens as we now have 2 chicken coops. All the manure is put onto the compost heap to break down. This job takes at least an hour but it has to be done every week without fail to ensure the health of our poultry.
The next job for me is to clean out and relay both of the fires in the house. We have a large wood burner in the front room and a range in the kitchen to cook with. Obviously with us being true English people, we have what is called a Sunday roast. This is a big meal that takes about 2 to 3 hours to cook but we can only do this in the winter as it is way too warm here to cook it in the summer.
Once both fires are cleaned and relayed the floors have to be swept as this job is a bit messy!
While I am sorting out the fires, Kev spends about an hour chopping wood. This goes onto the wood pile ready for us to use in the week for the fires.
We had a whole pig delivered, from a local farmer, last week. From this we make everything, sausages, black pudding, meat loaves, brawn, chorizo and bacon. Everyday we have to salt the bacon to ensure that it changes from pork into the bacon we want. We use a dry salt cure, mixed with sugar and herbs and this process takes about 2 weeks. We got a bit carried away this year, we have 4 hocks, 2 slabs of back and 1 belly salting. So every day we spend at least 30 minutes sorting this out.
The next job is normally something in the garden. This week it is to build the rock walls for the terracing. Our soil at the top of our vegetable beds is only about 2cm deep, so the idea is to build the walls to fill with top soil to enable us to produce more vegetables over the year. These terraces will almost double the available space for food production.
I will take the corn out to the turkey feeders around 11.30am, to boost the food available for them. We did not foresee having to do this but as the rains have not come, if we want them big enough for Christmas then it is a must. Had the rains arrived there would have been enough plant life to fatten them up. We ummed and arghed about doing this but gave in mid November when we knew the rains would not come.
Around 12 noon we have to stop what we are doing and come inside. This is the day for talking to our families. We have a good chat, eat our lunch and have a drink at the same time. Around 2pm we can start again.
At 2pm we normally finish off the gardening job, the wall building. We spend about another hour and a half outside. At 3.30pm its time to light the fires in the house and make the animal food again. We try to feed them about 4 - 4.30pm so that the animals go to bed with full crops. We also feed the rabbits too. They have pellets and a vegetable treat that needs to be pulled from the garden.
Once the animals are fed, I start to cook the dinner and make the bread for the next couple of days.
Kev is still outside watering the plants and collecting the logs for the night. This will take Kev about an hour, maybe a little bit more depending on what is still growing in the garden.
We will sit down to eat our dinner at about 8pm all being well. This is when the bread will go into the oven. After dinner we clean up and finally sit down at about 9pm. We sit and chat about how the day has gone and what has to be done the next day.
In the beginning I said we didn't realise how our lives would change. It has been a gradual process, developing the garden and adding different types of poultry along the way. As you can see from our Sunday (that is a relatively easy day for us) we don't stop. We are always tired at bed time and sleep well. We make sure we get at least 8 hours sleep as our bodies could not function as well on anything less.
As for the future, we want geese, goats and pigs too so I guess it will only get busier! The best thing about this way of life is it is for us. We are not working for anyone else, have no real time constraints, only the available day light hours and we love every minute of it!
Sunday 15 December 2013
Monday 28 October 2013
Carobs and the powder episode!
This blog post is a bit different today. This post has been in the making for almost 2 years now and finally, we have succeeded in making carob powder from foraged carobs.
I have never seen anything on the internet related to making carob powder at home, only the commercial heavy machinery stuff. I tried looking for a machine to use but had no luck what so ever. So I thought I would do a post on how we do it here, so if any of you want to have a go, you have some idea of what to do.
It all started 2 summers ago when Kev found a carob tree near our house that had carob pods on it. When I say carob pods, I mean about 50kg of pods (not to be sniffed at when free!)
We had never seen a carob pod before, although I had used carob when cooking a sweet, but I can't say I liked it that much.
First thing we had to do was to find out what we could use it for. Animal fodder seemed to be a good use, but I also found lots of recipes adding carob powder to cakes. So that was what we set about making.
We knew we had to bash the carobs and remove the beans. We tried a plastic bag and rolling pin...but this took forever and we didn't get all the beans out.
Next we tried a hammer and bag but all this did was pierce the plastic bag. So we tried smashing them in a pestle and mortar. This did remove the beans but bits flew every where, we just couldn't contain them inside the bowl.
After breaking them up we needed to grind them down. I bought a small coffee grinder but the carob just clogged it up. To get even half a cup of powder took about 3 hours of cleaning the grinder between grinds.
I tried putting them in my multi-processor machine that I use for everything! This would not touch the carob pods. They came out slightly smaller but not powdered. We gave up, fed the pods to the animals and spent the year thinking about it.
This Summer we collected more pods. Dried them in the sun for ages (about 6 weeks) as we couldn't decide how to process them.
Last week I decided to get a metal roasting tin and started to hit the individual pods with the pestle...this seemed to work. The seeds came out and the pods were smashed into smaller bits.
The carob pods
Broken by hand into smaller pieces.
Hit with the pestle
These are the seeds from inside.
The bits broken up with the pestle
Now it was broken up I decided to put it into the only machine I had not tried. The liquidizer. I put the bits in and switched it onto full and hay presto it worked.
I put the contents from the liquidizer into a fine sieve.
Stirred it with the end of my pastry brush to help push the powder through into a bowl.
And this was what I got! Carob powder.
This powder is raw. I have also roasted the pods before breaking them up with the pestle. This comes out a darker brown and when tasted is a cross between dark chocolate and coffee.
This is what I made in one morning, a couple of hours work.
I think that it is very time consuming but the recipes that you can add this powder too are plentiful. I make a beetroot and carob cake that we just love and if only for this, to us it is worth the time and effort.
If anyone out there has a better / faster method for making this powder please leave a comment below, I would love to hear how you do it.
Saturday 21 September 2013
Improving the soil...a developing quest!
When buying this house and land 3 years ago, we had no idea what we were letting ourselves in for. We just had this dream that we could produce all our own fruit and vegetables organically. We stupidly thought we would plant the seeds, plant out the seedlings and they would grow into healthy, happy, productive plants. Oh how wrong could two people be!
For starters we came from England, where it rains all the time and water is never an issue. The soil in my garden needed improving as it was clay, but nothing adding manure and compost wouldn't cure in a couple of seasons. However, we soon found out this garden was going to be a longer haul.
The first mammoth task was to clear the over-grown weeds. This was so that we could actually see the soil in all its glory! We laid down cardboard and weighted it with bricks. We waited two weeks and hey presto all the weeds had died! Great! How impressed with ourselves were we!
Now we needed to dig over the soil. Keeping in mind that it is now May and getting to 25-30 degrees and had not rained for two months, this was not an easy task. Adding to the hardship was the bedrock that was hidden 5cm below the surface of the soil.
During the two week wait we bought one ready made compost bin and soon realized it would not be big enough for our needs. We built another two out of old bits of worktop and bed frames that were left in the house. Not very pretty but functional and that was all that mattered.
We knew that we would never be able to grow anything in the soil as it was and we needed a quick fix in order to plant out all the seedlings we had grown on. We decided on making a makeshift raised bed that we could add compost and the like to. We used old telegraph poles and grey building blocks as the walls for the bed but needed something to fill it. Waiting for our compost to develop was not really an option.
Luckily, behind our house is where a shepherd leaves his flock over night. From December to April they stay at this corral. We asked the shepherd if we could use the manure for our garden and he said help yourselves... so we did. About 50 barrows where wheeled up and down the slope to fill the raised bed. This raised the soil level to about 30cm so would easily be deep enough to grow most vegetables.
Obviously we knew we wouldn't be able to plant the roots in this bed, as they hate manure. So we set about making a small patch for them. We just moved soil from different places around the garden and added it to our root bed so that it was deep enough that carrots, parsnips and beetroot would grow.
 The first year we went mad and planted every vegetable known to man in our two beds we had created. In the photo above you can see they are growing really well. Then the summer hit us. Temperatures of 30 - 40 degrees during the day and 20 - 25 at night. To say the veggies suffered would be an understatement. We were watering them twice a day and still they withered and died.
The shepherd kept stopping his car as he drove past. He would get out and say..."It's too dry, too dry!" shaking his head. I think he just thought we were stupid English that wouldn't last the distance. It felt a bit like he was right.
As September came around and the temperatures dropped we realised that this would be a good time to plant, a second spring is what the weather was like. Unfortunately all that survived were the beetroot and brasicas that were hardy to the colder weather, but on a positive note, we had learnt a big lesson about when we plant our crops to maximise production and reduce watering.
In the Autumn of that year we built another raised be that we filled with manure too. This would be for the brassicas the following spring and the beans and 'others' as they are known would go in the first bed.

After the first disastrous year, we knew we needed to improve the soil to enable it to hold water when it was hot. Also if we wanted to grow crops during the hottest part of the year we would need to give the plants shade.
Kev built a load of planters out of palettes that we could keep around the back of the house. In the summer this part of the garden is always in shade until the sun starts to go down. This worked for the salad crops but we would never be able to become self sufficient on how much we were able to produce in planters unless we covered the garden in them!
When we planted the seeds that year we used cardboard tubes and paper pots made by yours truly. This was to enable the seedling roots not to be disturbed when planting out but also the card and paper holds water when buried. This worked reasonably well but still not well enough to keep the plants alive in the Summer.
Drastic action was taken this last Winter. We built two new rock planters, one in front of the shed and one in front of the water store. We used thick cardboard as a layer to suppress the weeds and the added paper on top. We added a mixture of garden soil and compost and planted the summer salads in them and crossed our fingers! We were hoping the card, paper and compost would help to hold the water and with shade constantly being on the bed, evaporation would be at a minimum.


For starters we came from England, where it rains all the time and water is never an issue. The soil in my garden needed improving as it was clay, but nothing adding manure and compost wouldn't cure in a couple of seasons. However, we soon found out this garden was going to be a longer haul.
The first mammoth task was to clear the over-grown weeds. This was so that we could actually see the soil in all its glory! We laid down cardboard and weighted it with bricks. We waited two weeks and hey presto all the weeds had died! Great! How impressed with ourselves were we!
Now we needed to dig over the soil. Keeping in mind that it is now May and getting to 25-30 degrees and had not rained for two months, this was not an easy task. Adding to the hardship was the bedrock that was hidden 5cm below the surface of the soil.
During the two week wait we bought one ready made compost bin and soon realized it would not be big enough for our needs. We built another two out of old bits of worktop and bed frames that were left in the house. Not very pretty but functional and that was all that mattered.
We knew that we would never be able to grow anything in the soil as it was and we needed a quick fix in order to plant out all the seedlings we had grown on. We decided on making a makeshift raised bed that we could add compost and the like to. We used old telegraph poles and grey building blocks as the walls for the bed but needed something to fill it. Waiting for our compost to develop was not really an option.
Luckily, behind our house is where a shepherd leaves his flock over night. From December to April they stay at this corral. We asked the shepherd if we could use the manure for our garden and he said help yourselves... so we did. About 50 barrows where wheeled up and down the slope to fill the raised bed. This raised the soil level to about 30cm so would easily be deep enough to grow most vegetables.
The shepherd kept stopping his car as he drove past. He would get out and say..."It's too dry, too dry!" shaking his head. I think he just thought we were stupid English that wouldn't last the distance. It felt a bit like he was right.
As September came around and the temperatures dropped we realised that this would be a good time to plant, a second spring is what the weather was like. Unfortunately all that survived were the beetroot and brasicas that were hardy to the colder weather, but on a positive note, we had learnt a big lesson about when we plant our crops to maximise production and reduce watering.
In the Autumn of that year we built another raised be that we filled with manure too. This would be for the brassicas the following spring and the beans and 'others' as they are known would go in the first bed.
After the first disastrous year, we knew we needed to improve the soil to enable it to hold water when it was hot. Also if we wanted to grow crops during the hottest part of the year we would need to give the plants shade.
Kev built a load of planters out of palettes that we could keep around the back of the house. In the summer this part of the garden is always in shade until the sun starts to go down. This worked for the salad crops but we would never be able to become self sufficient on how much we were able to produce in planters unless we covered the garden in them!
When we planted the seeds that year we used cardboard tubes and paper pots made by yours truly. This was to enable the seedling roots not to be disturbed when planting out but also the card and paper holds water when buried. This worked reasonably well but still not well enough to keep the plants alive in the Summer.
Drastic action was taken this last Winter. We built two new rock planters, one in front of the shed and one in front of the water store. We used thick cardboard as a layer to suppress the weeds and the added paper on top. We added a mixture of garden soil and compost and planted the summer salads in them and crossed our fingers! We were hoping the card, paper and compost would help to hold the water and with shade constantly being on the bed, evaporation would be at a minimum.
This is the salad bed this summer. It has tomatoes and peppers growing up the trellis on the wall. Beetroot and spring onions at the front. As you can see everything in the garden is brown and dead but this bed produced all summer. So finally we had achieved our goal. Now we just need to make it on a bigger scale.
Wednesday 3 July 2013
Turkey update
For those of you that haven't read the previous blog on our turkeys, I will give you a quick outline. We were given 2 turkeys that were in a very bad state, May 2012. We named them Cranberry (the hen) and Paxo (the tom). These were hopefully going to be our breeding pair. Paxo was so fat he could hardly walk and had to roost on the floor. Within 3 months he had lost weight, was walking fine and even flying up on the coop every night to roost.

February 2013 we found our first egg in the turkey house. We were excited at the prospect of rearing poults naturally and allowed Cranberry just to get on with it. She laid 11 eggs and then went broody. We wrote down the date that she started sitting and worked out when they were due. Everything was going fine. We had a problem with the chickens going into the turkey house and so we started to shut the turkeys in the run to keep the chickens out.

One day Kev (who is normally at home all of the time) had to go out. When he returned Cranberry was outside the pen pacing trying to get back in. It's funny how she could fly over the fence out of the pen but hadn't worked out how to get back in! We didn't know how long she had been out so we just opened the gate and let her back in.
When the due date arrived and nothing happened, we decided to candle the eggs. They all looked like they had started to grow and then stopped. This must have been the time Cranberry flew over. We were very disappointed, mainly for her as she had sat for 4 weeks and nothing would come of it. We took the eggs away and just gave up on the idea for this year.
About 2 weeks later we noticed that Paxo was mounting Cranberry again at every opportunity. We crossed our fingers and hoped, without really believing, that Cranberry would lay more eggs. Within 4 weeks of taking the eggs away she was laying again. This time we took 2 of the eggs and put them in the incubator. We were determined to get at least one poult this time.
Reading on the internet rearing poults in the incubator is a very hard job. The eggs needed turning 5 to 7 times a day. This was impossible with our way of life, plus we had a hen die while she was sitting so hens eggs were placed in there too. We turned the eggs 3 times a day as we did the chickens eggs. The chickens eggs hatched within a week and then we candled the turkey eggs. Yeah they were both growing fine.
At this time Cranberry had got her clutch up to 11 eggs again and started to sit. She was a week behind our eggs in the incubator. This time if we went out we made sure she had water and food inside the house and we shut her in for the day.
We had visitors the week the incubator eggs were due and they got to watch them hatch. The first thing that we noticed was what massive feet they had! Both eggs hatched and we had 2 little poults, fantastic!


A week later was the due date for Cranberry. On the Friday we wanted to see what was going on and so in the evening at feeding time we waited for her to come out. We were going to sneak in and have a look to see what was happening. She came out of the house, ate a little food in front of it, walked around the house 3 times and went straight back in. We were so frustrated! We wanted to know if she had hatched any!
The next day we were working in the garden when we noticed Cranberry outside the house. We went running and inside the house were 7 little turkey poults. Wow, fantastic, none to 9 in a matter of a week!

Cranberry was the best mum, protecting her little brood at all times. She brought them out at 2 days old to meet us and their dad. He was displaying all over the place. He wasn't bothered at all by the poults allowing them to run around him. Feeding time was funny as the little poults were copying dad eating but whilst standing under him.
All of this was an absolute pleasure to see. The poults have been taught well by mum and dad. They forage for themselves and are now almost 4 weeks old. Mum is happy to let them roam at a safe distance too.
The poults were 2 weeks old when we noticed Paxo mounting Cranberry again. At 3 weeks old Cranberry started laying another clutch of eggs. This will be her 3rd clutch this year! We are keeping our fingers crossed that she will hatch another brood successfully.
These are the 2 poults from the incubator. I am mum and they follow me around and call to me if they can't see me. This is them at 4 weeks old roosting on the gate we have on the terrace. This week they will be put outside on the land and allowed to free range.


February 2013 we found our first egg in the turkey house. We were excited at the prospect of rearing poults naturally and allowed Cranberry just to get on with it. She laid 11 eggs and then went broody. We wrote down the date that she started sitting and worked out when they were due. Everything was going fine. We had a problem with the chickens going into the turkey house and so we started to shut the turkeys in the run to keep the chickens out.
The largest egg is the turkey egg, the other 2 are hens eggs.
Cranberry was appearing to be a brilliant mum, only coming out once a day for food, water and a dust bath, normally at feeding time in the afternoon. One day Kev (who is normally at home all of the time) had to go out. When he returned Cranberry was outside the pen pacing trying to get back in. It's funny how she could fly over the fence out of the pen but hadn't worked out how to get back in! We didn't know how long she had been out so we just opened the gate and let her back in.
When the due date arrived and nothing happened, we decided to candle the eggs. They all looked like they had started to grow and then stopped. This must have been the time Cranberry flew over. We were very disappointed, mainly for her as she had sat for 4 weeks and nothing would come of it. We took the eggs away and just gave up on the idea for this year.
About 2 weeks later we noticed that Paxo was mounting Cranberry again at every opportunity. We crossed our fingers and hoped, without really believing, that Cranberry would lay more eggs. Within 4 weeks of taking the eggs away she was laying again. This time we took 2 of the eggs and put them in the incubator. We were determined to get at least one poult this time.
Reading on the internet rearing poults in the incubator is a very hard job. The eggs needed turning 5 to 7 times a day. This was impossible with our way of life, plus we had a hen die while she was sitting so hens eggs were placed in there too. We turned the eggs 3 times a day as we did the chickens eggs. The chickens eggs hatched within a week and then we candled the turkey eggs. Yeah they were both growing fine.
At this time Cranberry had got her clutch up to 11 eggs again and started to sit. She was a week behind our eggs in the incubator. This time if we went out we made sure she had water and food inside the house and we shut her in for the day.
We had visitors the week the incubator eggs were due and they got to watch them hatch. The first thing that we noticed was what massive feet they had! Both eggs hatched and we had 2 little poults, fantastic!
This one had splayed legs so a splint was put on. Within hours it was walking.
A week later was the due date for Cranberry. On the Friday we wanted to see what was going on and so in the evening at feeding time we waited for her to come out. We were going to sneak in and have a look to see what was happening. She came out of the house, ate a little food in front of it, walked around the house 3 times and went straight back in. We were so frustrated! We wanted to know if she had hatched any!
The next day we were working in the garden when we noticed Cranberry outside the house. We went running and inside the house were 7 little turkey poults. Wow, fantastic, none to 9 in a matter of a week!
Cranberry was the best mum, protecting her little brood at all times. She brought them out at 2 days old to meet us and their dad. He was displaying all over the place. He wasn't bothered at all by the poults allowing them to run around him. Feeding time was funny as the little poults were copying dad eating but whilst standing under him.
All of this was an absolute pleasure to see. The poults have been taught well by mum and dad. They forage for themselves and are now almost 4 weeks old. Mum is happy to let them roam at a safe distance too.
The poults were 2 weeks old when we noticed Paxo mounting Cranberry again. At 3 weeks old Cranberry started laying another clutch of eggs. This will be her 3rd clutch this year! We are keeping our fingers crossed that she will hatch another brood successfully.
These are the 2 poults from the incubator. I am mum and they follow me around and call to me if they can't see me. This is them at 4 weeks old roosting on the gate we have on the terrace. This week they will be put outside on the land and allowed to free range.
Cranberry roosting with her poults under her wings.
We are so happy that everything has worked for us and our breeding pair seem to be happy and content with their lives. It has been a roller coaster of a ride at times, but to see mum and the poults out on the land doing what nature intended is just a priceless experience!
Saturday 29 June 2013
Outdoor fly problem...old method for reducing flies.
Flies are a real problem living here in the campo in Spain. Everyone complains that you can't eat outside in the Summer without the flies swarming your food. We thought that all the vegetation in the garden, when we first bought the house, was the problem, so we set about changing the garden, removing weeds and trees too close to the house. We re-planted more trees that we removed but in a place away from the house.
The following year the flies were less but still unbearable when sitting out on the terrace. Trying to eat out there was just a no no. Something had to be done!
One of our Spanish friends told us that his parents used to make fly catchers. They used to use bottles with 4 holes in the top, half filled with water. In the water you place a small piece of raw meat and hang the bottles outside. As the meat goes off the flies are attracted to it. They crawl in through the small hole and cannot get out again. They then drown in the water trying to get to the meat! We thought about this. We were sure the bottles would stink to high heaven, but we were game to give it a go. If it meant we would get our terrace back it had to be worth a try!
We set about making 2 bottles. We used the plastic pop bottles and put 4 holes in the top with a hot stick from the bar-b-que but you would get away with using a soldering iron. Make sure you do this outside as melting plastic fumes are poisonous. The 4 holes have to be big enough for the flies to get in but small enough so that they can't find their way out!

We added a little water and dropped in a little raw chicken. We then hung them out on the terrace. Within 2 days the bottles were swarming and there was no smell with them.

We have since made about 20 more bottles and hung them out on the terrace posts on the outside. We have also placed them around the garden too. They work brilliantly and now we can sit on the terrace without a swarm of flies annoying us!
The following year the flies were less but still unbearable when sitting out on the terrace. Trying to eat out there was just a no no. Something had to be done!
One of our Spanish friends told us that his parents used to make fly catchers. They used to use bottles with 4 holes in the top, half filled with water. In the water you place a small piece of raw meat and hang the bottles outside. As the meat goes off the flies are attracted to it. They crawl in through the small hole and cannot get out again. They then drown in the water trying to get to the meat! We thought about this. We were sure the bottles would stink to high heaven, but we were game to give it a go. If it meant we would get our terrace back it had to be worth a try!
We set about making 2 bottles. We used the plastic pop bottles and put 4 holes in the top with a hot stick from the bar-b-que but you would get away with using a soldering iron. Make sure you do this outside as melting plastic fumes are poisonous. The 4 holes have to be big enough for the flies to get in but small enough so that they can't find their way out!
We added a little water and dropped in a little raw chicken. We then hung them out on the terrace. Within 2 days the bottles were swarming and there was no smell with them.
We have since made about 20 more bottles and hung them out on the terrace posts on the outside. We have also placed them around the garden too. They work brilliantly and now we can sit on the terrace without a swarm of flies annoying us!
Wednesday 26 June 2013
And so there were ducks!
Living here in Spain, for 5 years now (wow time does fly.) We have never once seen duck eggs for sale. Finding a duck here in the supermarket is hard going too. We both love duck meat and so the natural progression from chickens to turkeys! to ducks just happened in early April of this year.
We haven't had the ducks long enough for me to say we are massively knowledgeable about duck husbandry but I just wanted to give you a run down of our journey so far!
In March 2013 we decide to build a duck pond. We knew that we wanted to keep ducks for meat and eggs, for our own consumption. We had also read that all ducks (except the Muscovy) need water to breed. Since we wanted them for meat, we obviously want them to produce babies and building a duck pond was the initial step. We spent a couple of days planning the pond, using what we had available, and then started work.
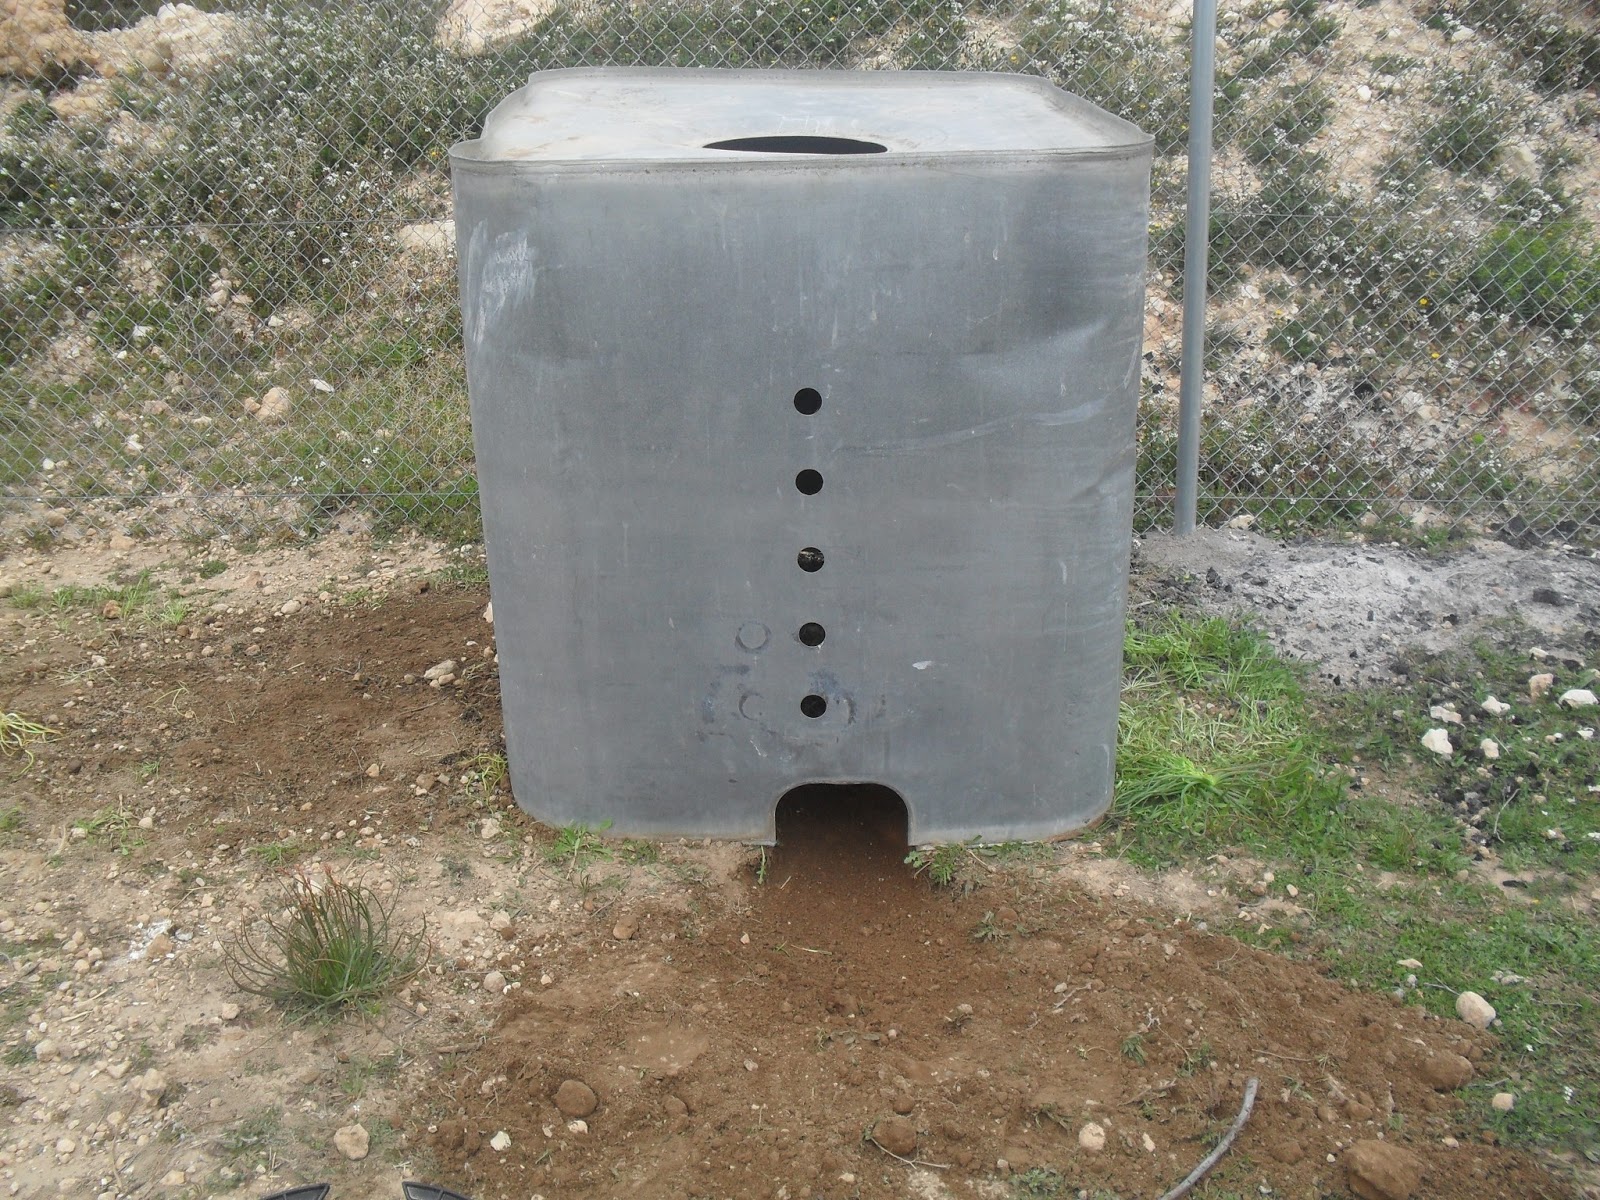
The shepherd had given us a water container and we decided to use this cut in half to make a basic pond. We decided on 2 levels with a little water fall connecting the two halves. We would install a solar pump to enable the water to be moved from the bottom tank to the top tank and so stop the water going stagnant.


We haven't had the ducks long enough for me to say we are massively knowledgeable about duck husbandry but I just wanted to give you a run down of our journey so far!
In March 2013 we decide to build a duck pond. We knew that we wanted to keep ducks for meat and eggs, for our own consumption. We had also read that all ducks (except the Muscovy) need water to breed. Since we wanted them for meat, we obviously want them to produce babies and building a duck pond was the initial step. We spent a couple of days planning the pond, using what we had available, and then started work.
The shepherd had given us a water container and we decided to use this cut in half to make a basic pond. We decided on 2 levels with a little water fall connecting the two halves. We would install a solar pump to enable the water to be moved from the bottom tank to the top tank and so stop the water going stagnant.
The water container
Cut in half
Digging the hole for the container
First one in place
Placing rocks around it
Second half...we wanted this higher than the first
second half sunk
Building the rocks up around the outside.
In 3 days we had the basis for our pond. We just needed to build in the water fall to connect the two containers and install the pump.
A week later the little garden center shop in the local village had some ducklings in. Kev went down to get some chicken feed and came back with 4 ducklings! So now we had to make them a house and fast!

The outside of the water container was metal. We decided to use this as the duck house. A problem with it was it had a big hole in the top and would let the rain in. We set about trying to fix this problem as this container would make a perfect size duck house.


The ducklings settled in well and within 2 or 3 weeks had grown and changed. We could see after a few days they were putting themselves to bed, so after a week we started to let them out on the land during the day and putting them back in their pen at feeding time.


.JPG)


The outside of the water container was metal. We decided to use this as the duck house. A problem with it was it had a big hole in the top and would let the rain in. We set about trying to fix this problem as this container would make a perfect size duck house.
We used a water butt lid
Put a pallet on top with this plastic cover
We then had to think about a run for them until they got used to where their new home would be. We took the end off of the rabbit run and pushed it up to the opening. The ducklings had their own water bowl and more importantly the chickens couldn't get to their food.
After about 4 weeks we started to feed them with the chickens. They were now out foraging all day and going back to their house at night. We had the pond almost finished but we need to source a solar pump to enable the water to be moved from one side to the other. The ducks use the pond and love it but we didn't realize how messy they were. They poop every where. So the pond water is now very green and dirty but they still seem to love it.
The ducks grew very fast and soon were as big as the chickens, although they were still wary of them and would move it a chicken came up to investigate.
We wanted the ducks to be a wild as we could keep them and this is what has happened. We have not tried to pet them and they will move if we go to close to them but at feeding time they will allow us to touch them so we can check on their health. We wanted them wild as I had read that when they get to maturity if they see you as one of the flock they will become aggressive, asserting dominance over you.
About a month ago a friend rang saying he had 2 ducks that were so noisy he didn't want them anymore, did we want them? So we gained another 2 ducks and then there were 6!
These 2 ducks were very, very wary of us in the beginning. They wouldn't even come at feeding time. After about 3 days they began to understand the routine and were in there with the others at feeding time.
We had real problems with the feeding, ensuring all the animals got their fair share. The chickens are boss and will chase off the ducks if they think they have something the chickens don't. We had to separate them at feeding times to make sure the ducks got their food. Kev built another make shift feeder from drain pipe and flooring sheets. It is fantastic and within 2 days the ducks knew which feeder was theirs. Unfortunately the chickens are not so accommodating!
Even now we have to stand guard at feeding times to fight off the chickens and allow the ducks to eat in peace.
These are the six ducks today, having a rest after their breakfast. They normally stick together, safety in numbers and all that. They seem very happy and we have even set them to work in the garden clearing out the millions of snails this year. They love snails and relished the challenge we set them. We are hoping next year that they will start laying and raise some ducklings so that duck will be added to the menu in our house.
Sunday 5 May 2013
Weed Killer
I saw this on the internet (although they used cider vinegar) and just had to see if it worked. We grow everything organically here, so no pesticides or herbicides will be used under any circumstances. We try to companion plant to stop the pests and introduce more of the predators in order to create a natural balance within our garden. Weeds however, are a major problem. I seem to be forever weeding the rock paths, taking the stones out and digging up the roots and then replacing the rocks.
 As you can see in the photo the weeds just take over and almost hide the paths. We could have concreted the rocks in but we wanted the garden to look as natural as possible. To find an organic weed killer was just the best find ever...cutting down on the work for me.

Recipe
10 fluid ounces of any vinegar (I used red wine as that was what I had)
1 table spoon of salt.
Washing up liquid
Instructions
Mix all the ingredients together
Place in a spray bottle
Spray where needed. (It really is that simple)
We use this on the paths to keep the weeds from hiding the rocks. I have found that spraying it in the morning on a fine day will kill the weeds by dinnertime. I just use this for the low growing weeds. I guess it would be just as effective on bigger weeds but the amount you would have to make would be times 10.
This is not a very clear photo but it was sprayed just 4 hours before on a sunny day and you can see the weed is already brown. I was amazed at how quickly and effectively it killed the tops. I sprayed this path once and it stayed clear for almost 3 weeks. Obviously the spray does not kill the roots with just one application perhaps you will need 2 or 3 to actually kill the roots off.
Recipe
10 fluid ounces of any vinegar (I used red wine as that was what I had)
1 table spoon of salt.
Washing up liquid
Instructions
Mix all the ingredients together
Place in a spray bottle
Spray where needed. (It really is that simple)
We use this on the paths to keep the weeds from hiding the rocks. I have found that spraying it in the morning on a fine day will kill the weeds by dinnertime. I just use this for the low growing weeds. I guess it would be just as effective on bigger weeds but the amount you would have to make would be times 10.
Sunday 7 April 2013
Recycled Strawberry Planters
.JPG)
This was an idea that I saw on the Internet somewhere. It looked fabulous and the more we thought about it the more the idea began to grow.
Here in Casinos in the summer months it is just too hot for the strawberries to survive. These planters allow the water to evaporate but it then condenses on the top of the bottle again so the soil stays moister for longer.
What you will need.
3 plastic bottle
Scissors
String
Compost
Plants

Take a plastic bottle and cut a hole in it.

Fill with compost to make the bottle stronger

Tie string around the fat end and double knot

Tie another piece of string to it and double knot

Join it to the second bottle string

Tie a piece of string to the neck of the bottle and run it to the second bottles neck

Take another piece of string, tie to the bottle top and at the end make a loop to hang it with

Repeat at the fat end of the bottle...this will be the top bottle

Should look like this

Next we hung them and then tied on the third bottle

Always double knot or more
.JPG)
You can now plant whatever you want to in your bottles. We put in strawberry plants and hung them outside on the wall.
We are planning on using this method for all our strawberry runners as we can fix yogurt pots to the bottle while the runners root and then plant straight into the bottles.
Subscribe to:
Posts (Atom)